


Okay, so you’ve decided that your old tiles aren’t cutting the mustard anymore and it’s time they went to the ceramic planet in the sky. We hear you loud and clear and are here to guide you through from safety and tools to clearing up the mess. So, if you’re ready, buckle up because it’s going to be a rewarding but bumpy ride!
Safety first
Personal protective equipment needed:
- Safety goggles
- Hard wearing gloves
- Noise cancelling earphones/earplugs
- Respiratory protection equipment (dust masks)
We’ve partnered with Start Safety UK to offer 5% off by clicking the link or using the discount code Tile5 in checkout (new customers only).

Removing tiles is just one of those tiring and messy but necessary jobs that needs care to be done safely. There will be a lot of dust and tiles will break, leaving very sharp edges. As the last thing you want when DIYing is a trip to A & E, we cannot stress enough the importance of covering your vulnerable bits appropriately.
To prevent low flying ceramics from lodging themselves in your eyes, safety goggles are a must. As a tile chip’s flightpath isn’t limited to just eyes, you will also need to invest in a pair of sturdy, hard wearing gloves. Trust us when we say the sneaky shards will try to pierce you anyway they can if you’re not prepared enough, so cover up and don’t let them win!
Unfortunately, the tiles have another arm to their attack; dust. It will go everywhere and as breathing that nasty stuff in is definitely not good for your poor lungs, please open windows where you are working to ensure ample ventilation and wear a suitable face covering.
Another sensitive part of your body that's usually overlooked when preparing for safety is the ear; removing tiles can get very loud due to the heavy hammering that will be going on and this can seriously mess with your hearing. Noise cancelling headphones or ear plugs are good options if you don’t want to feel like you’re in a church bell ringing practise!
Once you’ve got these safety features in place, the task itself will be fine and dandy.
Put dust sheets down
As we just mentioned, dust and grit will get everywhere so remove everything out of the room that you can, cover the rest with sheets / plastic as much as possible and keep all the doors to the room closed unless you want your home to mimic the Sahara for a few weeks.
Cover sinks, drains and valuables
If you are working in a room that has sinks and drains, it is a good idea to plug those in to prevent anything from sliding down and possibly causing problems later on. Also, as shards can damage any furniture and amenities in your room, make sure these precious pieces are covered to keep everything in tip top condition. It’s not just the human safety that’s valuable; we don’t want any furniture casualties either.
Tile Top Tip: if you plan to keep the floor in the room you’re renovating, make sure you cover it with something thicker than just sheets. If the covering is too thin, the broken tiles can do damage through it.
We recommend making use of all those online delivery boxes that pile up by flattening them and putting those on your floor. Shards like to bounce when they fall so it’s a good idea to cover all your area, and not just the part you are working above.
If you have any spare old duvets, you could also put these down as they can be thick enough to provide a brilliantly cushioned base to foil the shards’ destructive designs.
What do I need to remove tiles? - Tool up
Once you and your room are nice and covered, it’s time to get down to the elbow grease. For this section of the job, you will need:
- bolster chisel
- claw hammer
- grout scraper
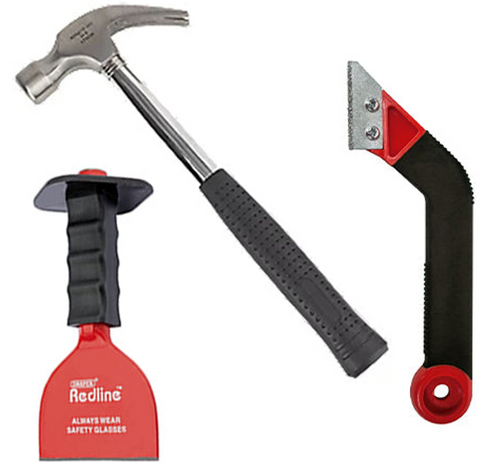
The bolster chisel and claw hammer are invaluable here. The bolster chisel gives you a bigger area to hit with the hammer, potentially saving you the pain of smacking your own hand, and the claw hammer gives you that extra leverage to prise the tiles from the wall.
Can I just use my normal chisel to remove tiles?
Well, yes but unless your hammer wielding skills rival Thor, it’s probably best to cover yourself on this one and use the bolster chisel. Particularly as you get tired during the job and your aim goes squiffy.
At this point it’s worth noting that the above aren’t the only important items. You will also need:
- heavy duty/rubble sacks
- broom
- dustpan and brush
This is so you can go in with the intention of cleaning up as you work, even if you don’t actually end up doing it. That said, it is much easier to tidy in pit stops instead of just leaving it to the end because the more debris you have in the room, the more likely something is to get damaged.
So, our advice is to take the time, take the care and put your smug face on at the end when you have minimal casualties.
Where do I start when removing tiles?
The easiest place is to find a loose tile. To locate one, take the handle end of a screwdriver and tap the corners of the tiles until you find one that moves. If you do, happy days; that’s the first tile to go. If you don’t, not a problem. As a rule of thumb, the loose ones are an easier starting point but finding the edge of a tiled area with easy access, like a doorway, is also a good place to begin.
Tile Top Tip: If your tiles aren’t moving for love nor money use a grout scraper to carve around the tile and then get your chisel out.
Once you have an access point to the tile, all you have to do is sit the chisel with its point tucked behind the tile and tap it with the hammer so that the chisel starts to work its way down between the wall and the tile. Then, pull the chisel slowly towards you so that it releases the piece from the wall.
After you’ve mastered that for the first tile, rinse and repeat until they are no more!
Handy hints to help keep you incident free:
- Try to start from the top of the space and chisel downwards; this way you are less likely to take a sharp, low flying shard to the face, as the pieces should be travelling towards your hardy footwear and not up.
- If there are any obstacles in the room such as sockets or switches, please make sure you turn off your electrical supply before whacking the area around those puppies with a metal instrument.
Another one bites the dust
So, you’ve managed to get the tiles off the wall; well done you! Time for a well-deserved cuppa and a biscuit. Why not even push the boat out to the chocolate covered ones? You’ve earned it.
After you’ve given yourself a pat on the back for successfully prising those tiles off, you may notice that there’s still some adhesive stuck to the wall. That’s completely ok. It’s just time to transfer those chiselling skills to conquer that adhesive too, because it is pretty much the same technique.
As we have said before in our How to prepare a wall for tiling blog, it really is a case of reap what you sow with getting rid of the adhesive. Whatever you are planning to do with the wall, you will need to knock off the proud, sticky out bits, even if you are dab and boarding it.
The boarding can only get as close to the original wall as the biggest bumps allow and if the boards are far away from the original wall, you will have a smaller room. Maybe the difference in size won’t be that much but it can have knock on effects to your project further down the line, particularly for making sure all your kitchen units or bathroom pottery fit where you want them to go.
Similarly, if you are tiling or painting straight onto the wall after the old tiles are gone, you will need as level and flat a surface as possible so that your future self doesn’t just focus on the imperfections of wonky work. So, get your chisel back out and flatten that beast!
When the tiles are off - we are the champions
Okay, the tiles are off the wall. Check. The adhesive is flattened as best as it can be. Check. The finishing line is definitely in sight but there is just one more thing to do before you can officially sign off this whole stage, and that is to clear up.
Hopefully you’ve managed to tidy up as you go so there’s not loads left for you to do now but if you got in a chiselling frenzy and forgot, don’t sweat it. Just grab your handy broom and get that rubble in the rubble sack.
As the shards are still sharp and you'll probably pick up some of the bigger pieces by hand, we recommend still wearing your hardy gloves even though they may make your fingers clumsy. We like having the same amount of fingers coming out of a project as going in, and we’re guessing you do too, so please keep them on.
Now you’ve done a stellar job clearing up all the rubble and getting it into the sacks, the last thing you have to do is get rid of the waste responsibly.
If you've got a big project on, maybe a skip or skip bag would better fulfil your disposal needs. But if your project is relatively small and you carried the work out on your own property, you could go to your local authority household waste and recycling centre and dispose of it there.
If you’re a contractor, you will need to treat it as commercial waste. Please check your local council site for more specific details.
You're done - congratulations!
You showed those tiles who’s boss! Give yourself a pat on the back and a well-deserved break; you made it. After you’ve recouped and regrouped, it will be time to move on to the next portion of your project.
If you’re not re-tiling we wish you well and part as friends but if you are tiling, Tile like you mean it can guide you through the process.
As ever, we love to see how you’re getting on (the good, the bad and the ugly) so please head on over to instagram and send us your creations!